![]()
For Customers, Ad Agencies, Sales Representatives, and Sales Assistant/Team Leads, this section does not apply to you.
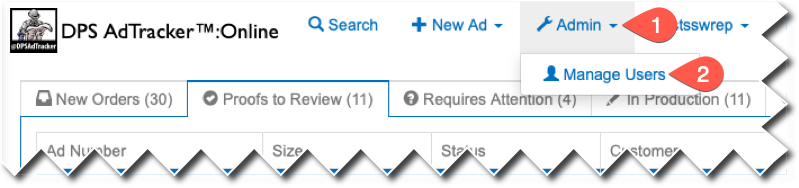
To administer ATOLv7 User Accounts, click on the ADMIN menu and select MANAGE USERS.
You will be presented with the MANAGE USERS screen where you can either search/browse users or add new users.
To search for a user account, you can provide the following:
•Search Criteria where you can specify text that you would like to search for. If you do not specify text, it will find all users matching the User Type and Site combination you have selected.
•Filter by User Type where you can optionally limit your search to a specific user type such as Customer, Agency, Sales Representative, Sales Assistant, Manager, or Administrator (you will be limited to one security level below your level).
•Search by Field where you can choose to search by User Name, Full Name, Customer Name, or E-Mail Address.
•Site allows you to restrict your searches to a specific Site, Property, or Company. Not all organizations use this field. Others may force this to a specific value.
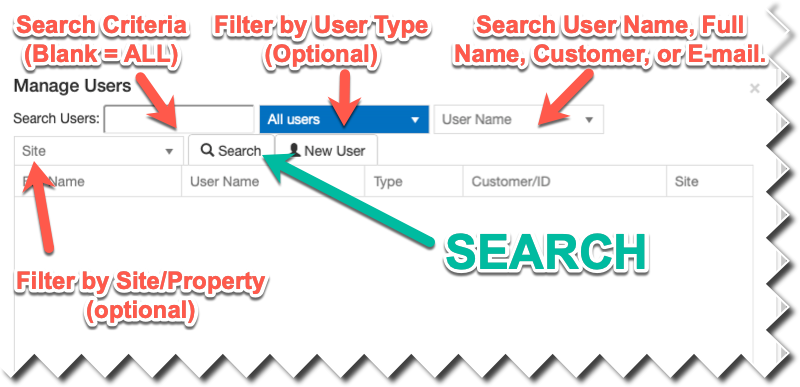
Then click the SEARCH button.
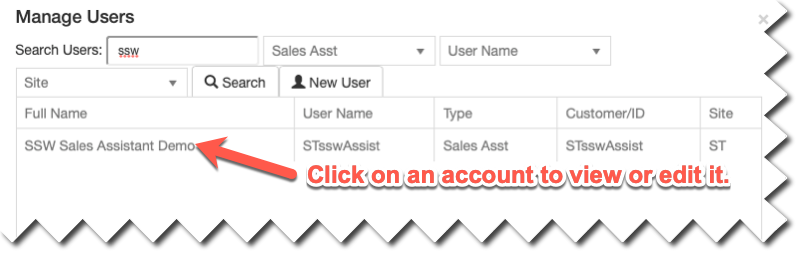
To edit an account, simply click on the row and it will display the details.
The contact form contains the following fields:
•User Type can be Customer, Agency, Sales Representative, Sales Assistant, Manager or Administrator (you will only be able to see choices below your current User Type). When you change User Type, you will may see different choices than the screenshot shown.
•Site refers to the Site, Property, Business Unity, or Company that the account exists in. If left blank, the account works with all sites.
•Full Name is the Contact's Full Name and will be used in all communications with them.
•Rep ID is the Sales Rep ID in ATOL. It must be prefixed with the SITE CODE, so if the Site Code is ST and the Rep ID is ROP75, then you would type STROP75. If an assistant does not have a true Rep ID, you should make this the same as the User Name.
•Email is the Contact's E-Mail Address.
•Phone is the Contact's Primary Phone.
•Alt Phone is a place to store a possible Alternate Contact Phone.
•Password/Verify Password only need to be populated if you are changing the account's password for them.
•Email Options allows you to configure if the account receives Automatic E-mails.
•White Glove is an administrative attribute that that you should only use if directed.
•Select Rep will allow you to associate this account with a Sales Rep Account by selecting it from the dropdown list and clicking Add Association. For more information on Sales Assistant/Team Lead Accounts, please review Manage Users > Sales Representatives Accounts.
Understanding Email Options:
•Block all ATOL Email will suppress Order Confirmation/Submit Material Request (CRM) and Proof Ready e-mails. This is the default choice when you use the Add Customer Contact function. It will not block HOLD e-mails to Sales Representative and Sales Assistant contacts. Those cannot be blocked.
•Receive all Email will deliver all types of automatic e-mails including both Order Confirmation/Submit Material Request (CRM) and Proof Ready e-mails.
•Block only CRM Email will block Order Confirmation/Submit Material Request (CRM), however, it will automatically send Proof Ready e-mails. It will not block HOLD e-mails to Sales Representative and Sales Assistant contacts. Those cannot be blocked.
•Block only Proof Email will deliver Order Confirmation/Submit Material Request (CRM), however, it will block Proof Ready e-mails. It will not block HOLD e-mails to Sales Representative and Sales Assistant contacts. Those cannot be blocked. If you would like to send a proof to a customer configured this way, you must visit the CONTACTS tab of the ad and click the SEND PROOF button. For further details on how to manually send a proof, please review Viewing Ad Contacts / Sending Proofs.
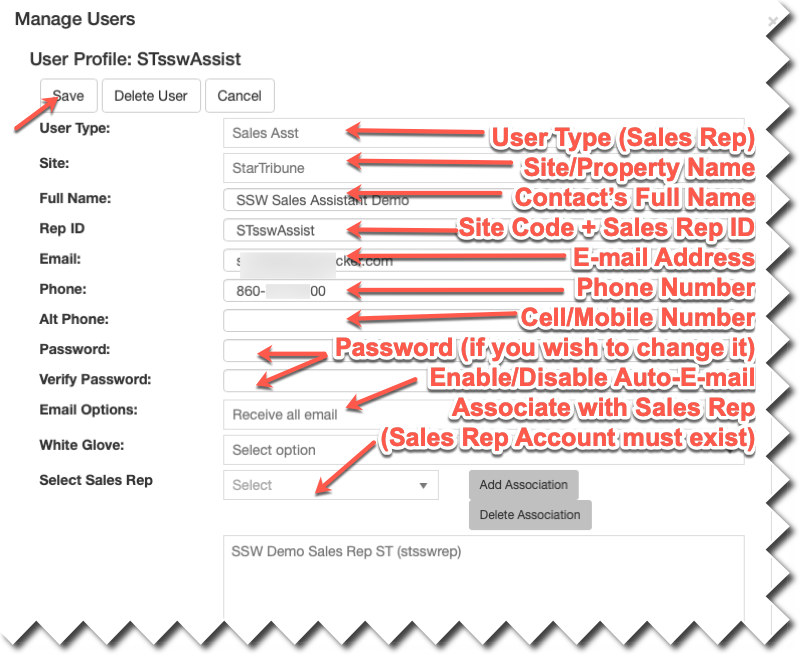
When you are finished making changes click the SAVE button.
If you need to add a NEW USER, click the NEW USER button and fill out the same form. You must also provide a USER NAME, which is the user name that must be typed to login.